
profile projector Digital Readout
Digital readout is a multi-function digital display processing system, which is used on profile projector to finish precise measurement of geometrical work-pieces. Work-piece measurement includes work-piece adjustment, creation coordinate origin, measuring work-piece via sample collection etc.
1.2 The Name and Function of Each Parts
This section describes each part’s the name and functions of DP100 digital readout.
1.2.1 Front Panel Introduction
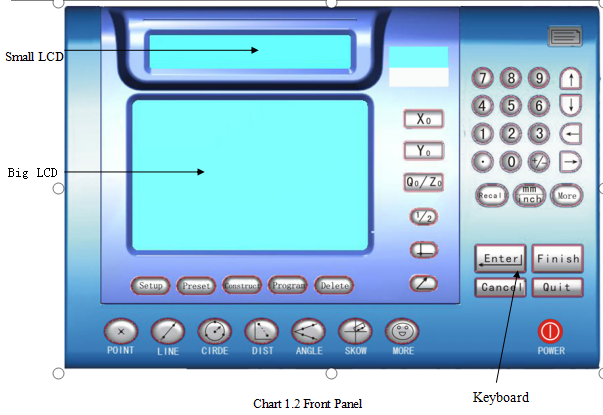
Chart 1.2.1 Front Panel:
1)、Small LCD screen
Display operation cue
2)、Large LCD screen
Display measuring results etc.
3)、Keyboard
Through Keyboard, you can create kinds of settings and input data
The basic graphic elements generated by DP-100 includ point, line, circle. The angle and distance is the combination result of the above graphic elements, but in DP-100 they still are looked as graphic elements. Graphic elements are short for graphics, graphic element or element.
When new graphic is created, it will be put into the graphics list. DP-100 can save 100 graphs (001-100).
1.4.3 Sample Collection
In Measuring, the coordinate data of a special point put in DP-100 system, the DP-300 calculate the correct measurement graphics process. These graphic elements used to create the special point are the sampling points. Except for the measurement of distance and angle, the max points for other graphics measurements can up to 50 points.
1、Measure the Graph
Collect sample points on the work piece to create graph
2、Preset the Graph
Put the necessary information through the keyboard to create new graphics
3、Create the Graph
Put the previous generated graph portfolio into a new graph.
Rapidly orient an already existing element in the list.
1. Relative / absolute Coordinate Ssystem
Absolute Coordinate system refers to the basic coordinate system
Relative Coordinate system means the coordinate system which is relative to absolute Coordinate.
2. Polar /Rectangular coordinate
Rectangular coordinate expresses a point as with (x, y)
Polar angle coordinate expresses a point as with (ρ, θ)
For Example:LCD dispalys“The current coordinates location”
X window displays 1.000
Y window displays 2.125
It means the current coordinate is(1.000,2.125), but if convert polar coordinate is(2.349,64.799) , the display interface is as the chart 1.7 show.
![]()
Chart 1.7 Polar coordinate display
Note:If it displays polar coordinate in small LCD, the coordinate system in large is rectangle coordinate.On the contrary, If it displays rectangle coordinate in small LCD, the coordinate system in large is polar rectangle coordinate.
There are two kinds of measurement patterns, One is that before measuring, pre-set the measurement points (max is 50 sample pionts); another is that before measuring it is no need to preset the sample points quantities which will be decided during measurement. You can choose any kind of measurement pattern via presetting in the internet function setup.
DP-100 digital readout provides coordinate rotation to improve measuring precision and in order to improve the measuring precision, and make the user feel more convenient. The main purpose of coordinate rotation is help user to adjust the work-piece postion.
When the work-piece edge is irregular or has angle with X-axis, coordinate rotation function allows the operator rotate X-axis to the edge position of work-piece to improve accuracy and to be convenient to measure.
After putting in numbers, press ![]() key to confirm input number. Press
key to confirm input number. Press ![]() key to cancel input number.During putting in, press
key to cancel input number.During putting in, press ![]() key to cancel the number put in last time, also can press
key to cancel the number put in last time, also can press ![]() at the beginning, it means that you put in the default number displayed on the screen.
at the beginning, it means that you put in the default number displayed on the screen.
Name: Mikrosize
Mobile:0086-13918745376
Tel:0086-769-85331789
Email:mikrosize@188.com
Add:NO7 East Xingfa Road Wusha, Changan Town, Dongguan, China.
 Microsize
 Microsize